
How to Make the Most of Two Days in Yosemite
“Climb the mountains and get their good tidings. Nature’s peace will flow into you as sunshine flows into trees. The winds will blow their own freshness into you, and the storms their energy, while cares will drop off like autumn leaves.”
John Muir, Our National Parks
Most common wisdom says to spend at least a week in Yosemite, while others argue you need about 10 years. If, like me, you only have a short amount of time to explore what is widely considered one of the best national parks in the U.S., I hope this guide can be somewhat helpful. It covers how to see spectacular views of the Valley, meadows, lakes, waterfalls and even giant sequoias.
While I was searching for the best way to spend slightly over 48 hours in Yosemite, I kept running into two of the same issues:
- They were focused on driving to lookout points, rather than exploring on foot.
- The sights were confined primarily to the Valley. While the Valley is obviously a wonder in its own right, there is much more to the park
So, if you’re looking for a guide focused more on driving to the most lookout points possible or seeing everything in the Valley only, this guide is not for you. However, if you want to learn how to cover decent ground and do a lot of hiking over two days, continue reading.
Without further ado, let me tell you my ultimate guide to Yosemite in 2(ish) days.
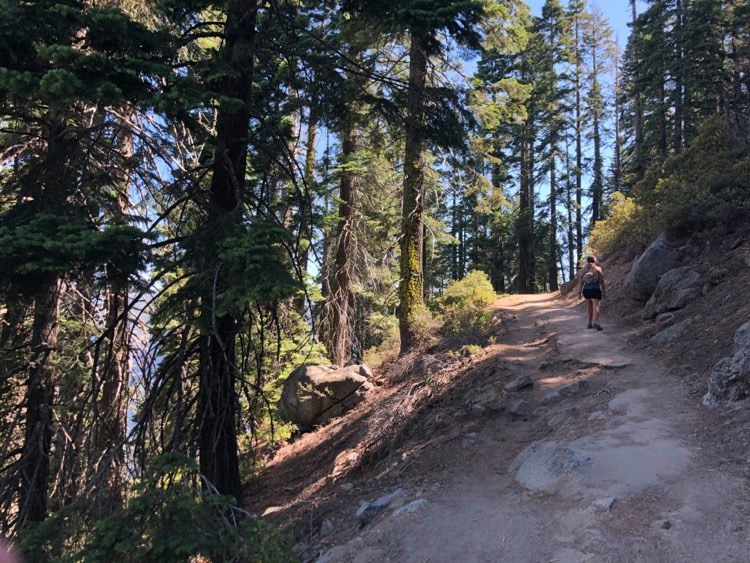
1) Choose at least one medium-to-hard hike in Yosemite Valley
I visited Yosemite with my fiancé, and we chose to do two moderately difficult hikes each full day in the park, as well as some easier hikes and nature walks. This decision allowed us to go on one popular, semi-crowded hike, as well as one that was significantly less crowded but even more beautiful. Both hikes gave incredible but different Valley views from several angles, so I’m glad we did both of them.
This decision was easy because I love to hike and am in relatively good shape. However, my body was still incredibly sore afterwards, and I thought my feet would never forgive me. If you aren’t as big of a hiking fan, I’d recommend choosing one main hike for your first day, then a few easy-to-medium hikes and lookout points the second day.
For help choosing these hikes, we used All Trails. They have a list of the top 10 hikes in Yosemite, as well as reviews and difficulty ratings. The premium version also gives you the option to download a map to follow during the hike.
The two hikes we chose were Nevada Falls and the Four-Mile Trail to Glacier Point and did not regret our decision at all.
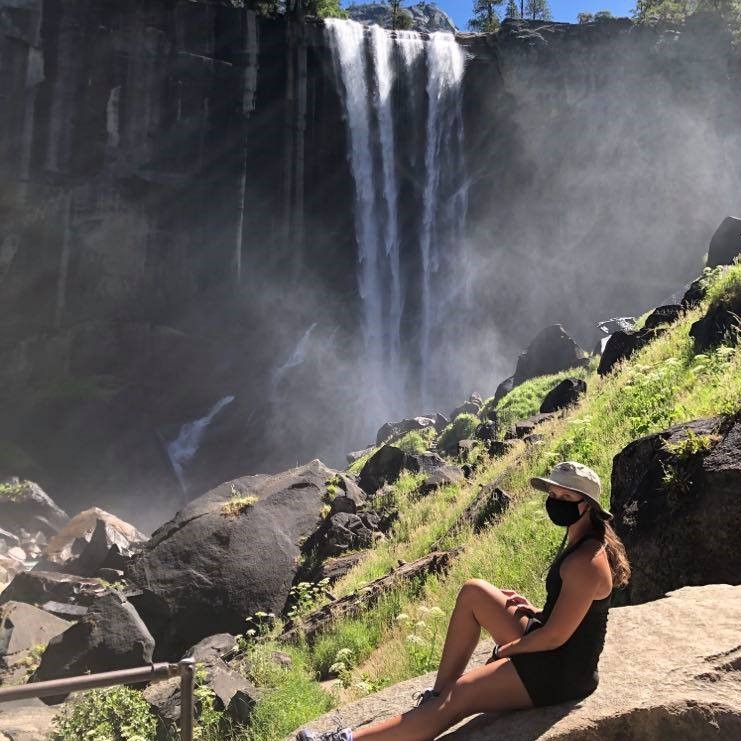
Vernal & Nevada Falls
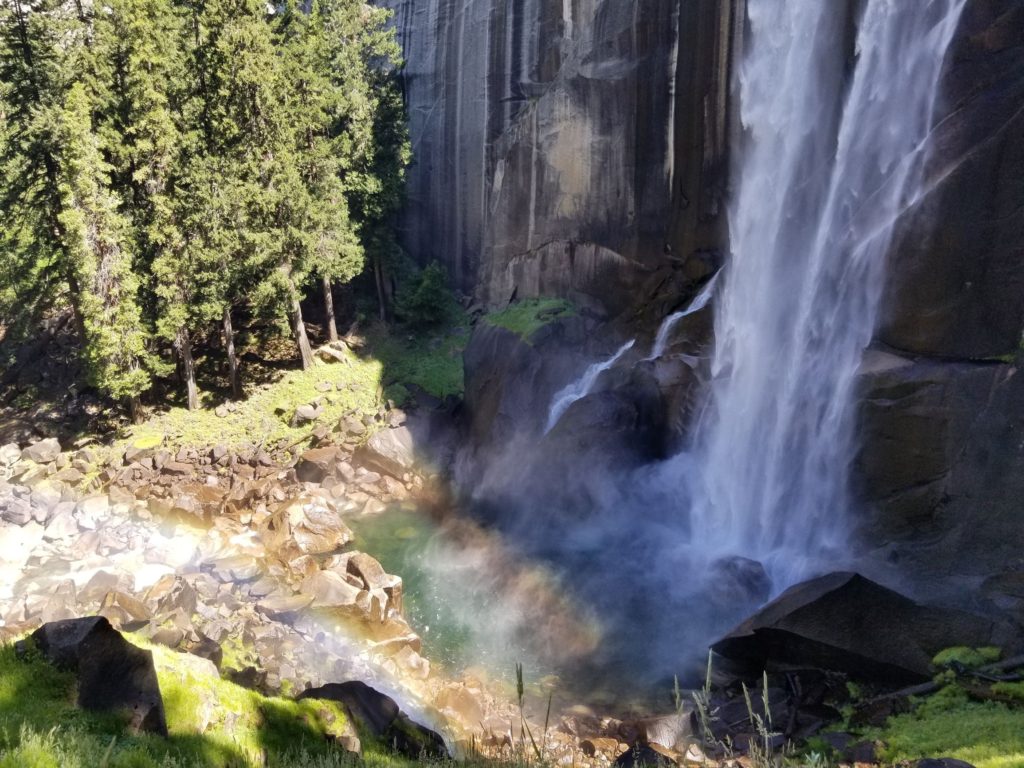
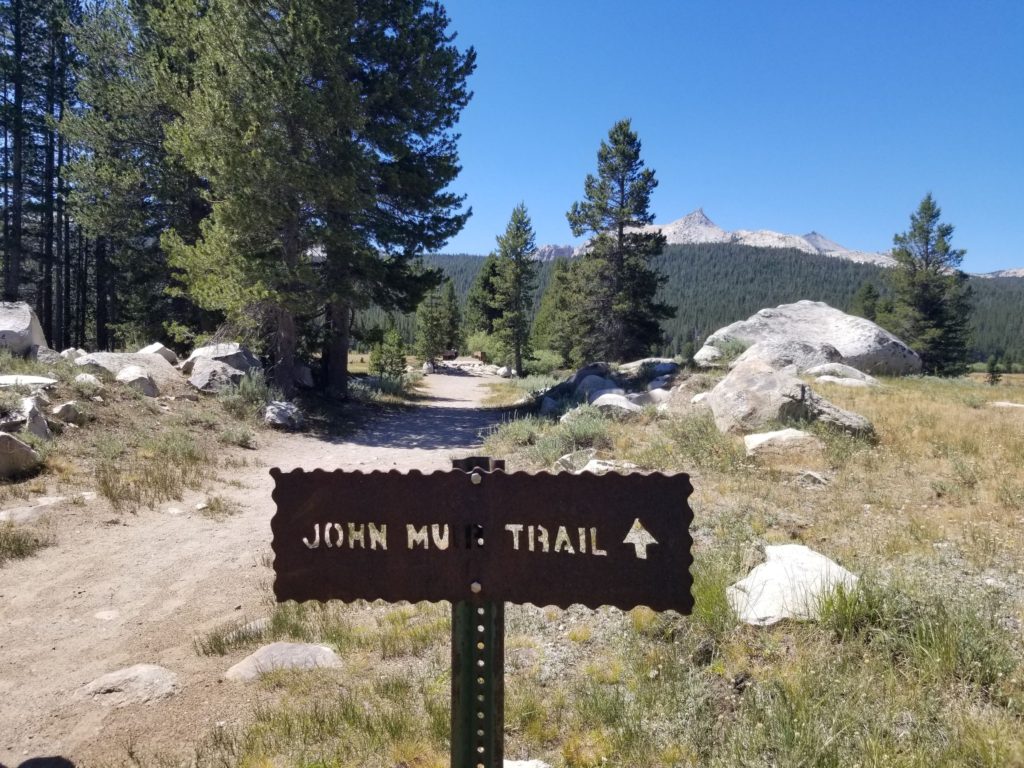
This hike via the Mist Trail is ranked as the #1 Yosemite Valley hike on All Trails, so we chose to hike it first. The map says it is 8.8 miles round trip, but my Fitbit counted nearly 10 miles – likely because I have shorter strides than the average person. During non-COVID times, I believe you can do this as an out-and-back hike, but I always prefer loop trails when possible regardless. For this loop, you take the Mist Trail up to the falls, then the John Muir Trail back down.
The reason this is named one of the best hikes in the Valley is because you can do it as part of a hike to Half Dome or Glacier Point, which means you get awesome views of the Valley from above, as well as of Half Dome itself. Basically, this hike gives you one of the best views you can get without a Half Dome permit.
This trail also gives you views of not one, but two major waterfalls. The hike up to the first fall is reminiscent of climbing a giant granite staircase. It can be crowded, so be prepared to wear your mask for most of it. The crowds are even worse at the top, so I recommend taking the opportunity to stop at some viewpoints along the way to Vernal Falls.
Climbing to Nevada Falls
You can stop after reaching Vernal Falls, but I recommend climbing until you reach Nevada Falls. Not only is this climb much less crowded and more peaceful, but you no longer feel like you’re climbing stairs as you go through forests on your way to the top. Because fewer people climb all the way to the second waterfall, you’ll have more room to spread out and take in the views of the falls and Valley.
Despite the beauty of the waterfalls, descending via the John Muir trail was my favorite part of the hike. This part is where you really get solid views of Half Dome. It is also the most jungle-like part of your trip, with amazing moss and vegetation in general.
The hike itself is pretty moderate in terms of difficulty overall if you’re used to hiking in the Western U.S. The first part can be a bit harder if you’re wearing a mask most of the time, though. It also gets crowded even early on in the day.
This hike was good for getting some nice views on a moderately difficult hike. However, the best views came the next day.
Four-Mile Trail to Glacier Point
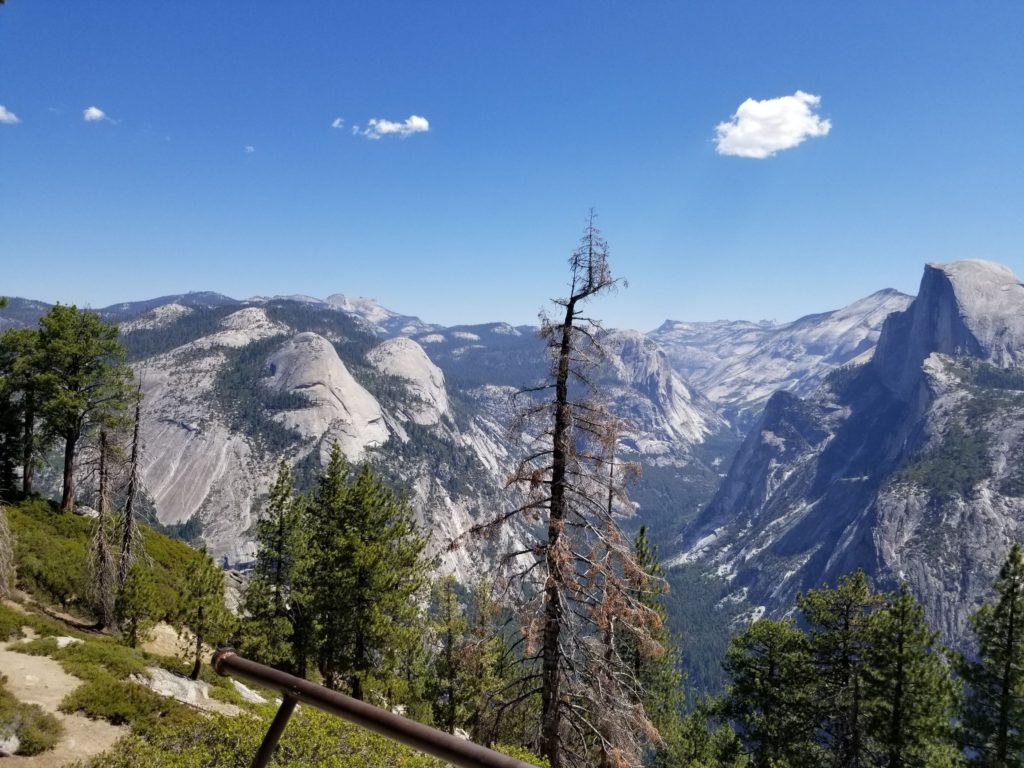
The Four-Mile Trail is a bit of a misnomer. It is a 9.2-mile out-and-back trail to one of the most popular lookout points in Yosemite – and for good reason. Apparently, this trail used to only four miles one-way, but they added the additional 0.6 miles to make it less steep. And honestly, I’d have hated to see it before it was made less steep, because this may be the most consistently steep trail I’ve climbed. This trail is essentially four and a half miles of constant incline (then decline back down). At some points, you think it is going to start evening out. Nope.
But I’m not complaining (much) because the views more than make up for it. I’m not talking about the views at Glacier Point, though they are obviously famous for a good reason. What makes this climb worth it are the views you get throughout the entire journey. As you begin ascending, the Valley starts opening up below you. If you think Tunnel View is amazing, it is nothing compared to what this hike gives you. You are rewarded with views of both Half Dome and El Capitan as you inch closer to the sky.
When you’re close to the top, you also walk through a tree-filled forest and feel like you’re in another world.
Then you’re at Glacier Point.
I would call it breathtaking, but my breath was long gone.
I believe we passed no more than six people during our hike, but Glacier Point had dozens more people because you can also drive to it. But if you have the ability, I think the hike is worth it.
Aside from these two hikes, we did a handful of other easy-to-moderate hikes and nature walks to check off the rest of our must-sees.
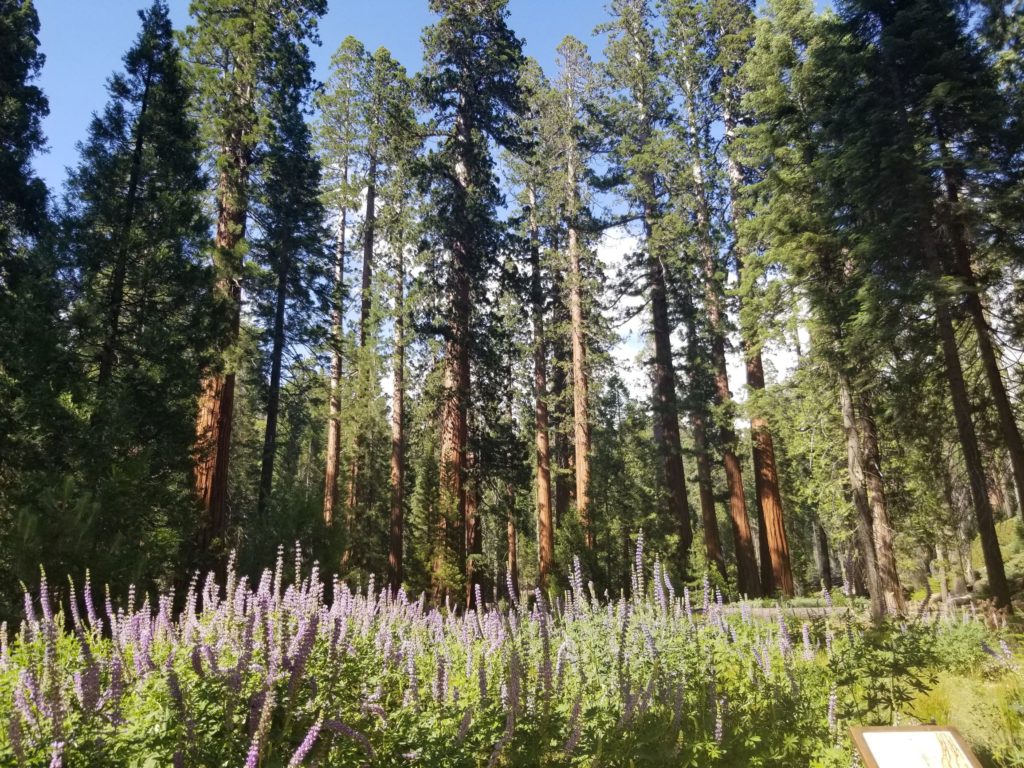
2) See the giant sequoias at the Mariposa Grove
Did you know sequoia trees can grow to be over 250 feet tall and 30 feet in diameter? If that sounds impressive (or unimpressive), wait until you see them in person to be truly filled with awe.
Located in the southern part of the park, the Mariposa Grove of Giant Sequoias is the largest sequoia grove in the park. It is home to 500 mature sequoias, including the tree known as the Grizzly Giant.
Though there is typically a shuttle taking visitors from the Welcome Plaza to the Grove, it is not operating right now due to COVID concerns. However, I believe they are allowing those with a valid handicap designation to drive there.
Otherwise, the only way to get to the Marisposa Grove right now is to take the Washburn Trail from the Welcome Plaza to the sequoias. This trail is an easy-to-moderate four-mile (round-trip) hike to the starting point of the grove. It is primarily a dirt trail, and you wind through trees and across short, sturdy bridges to get to the grove.
Once there, you can choose from a variety of loop trails varying in order from easy to strenuous: Big Trees Loop Trail, Grizzly Giant Loop Trail, Guardians Loop Trail and Mariposa Grove Trail.
This was later in our second day in Yosemite. We had already hiked several trails, including our two longer trails. We chose to admire the trees along the Big Trees Loop Trail and call it a day. However, if we’d had just a bit more energy (and perhaps better callouses on our feet), we’d have hoofed it to at least the Grizzly Giant.
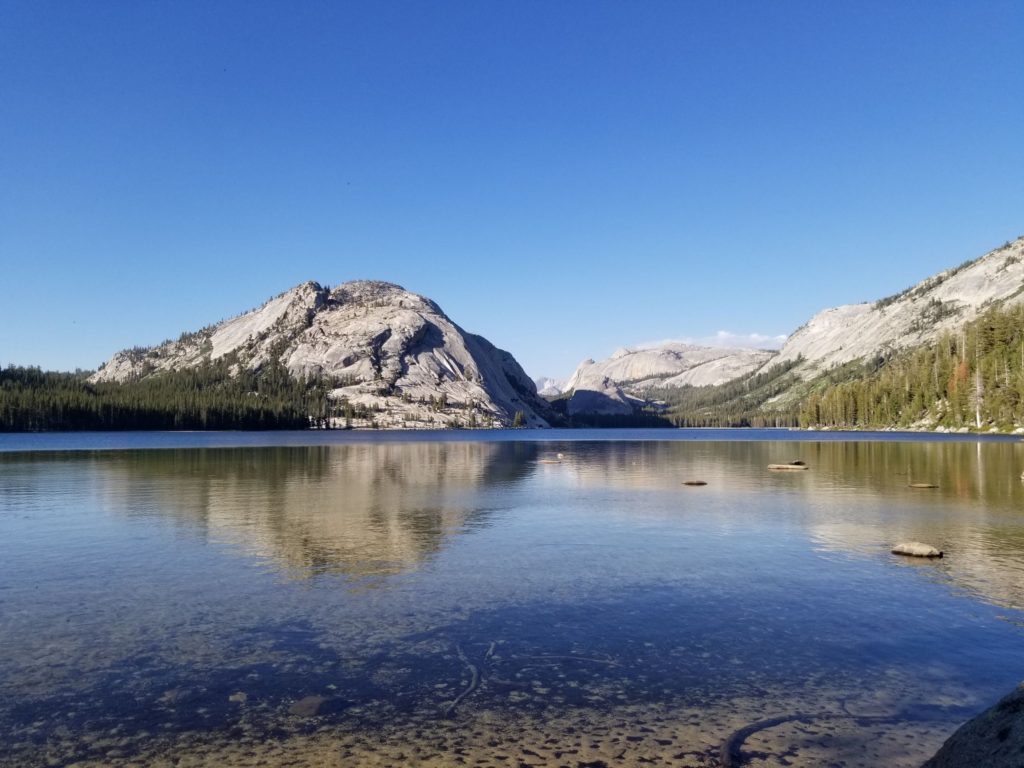
3) Find one lake outside Yosemite Valley
Yosemite National Park is often associated with giant granite walls and rushing waterfalls. But its mirror-like lakes are just as impressive. (In fact, there is even one named Mirror Lake.)
While in Yosemite Valley, you can find visitors floating or splashing in the nearby streams and lakes. And trust me, they are beautiful. But I think the lakes outside the popular Valley spots are even better.
There is no shortage of lakes to admire, but we chose the alpine jewel of Tenaya Lake. This lake is spectacular at any time of day, but we chose to go close to sunset, which gave us the perfect view of the setting sun and reflecting trees.
You can come to this lake to camp, set up a hammock or have a float or paddle board, but we chose to hike from one shore to the other.
This hike was a pretty easy 3.4-mile out-and-back trail. There is plenty of parking at the trail head because it’s outside the Valley and does not have many people on the trail. You walk through the woods, along the perimeter of the lake, admiring the water, trees and mountains.
On the way back, we even saw a curious coyote! This coyote was walking up to the water and seemingly checking out campsites. Although coyotes are generally pretty harmless to people, it’s important to keep your distance from wildlife in Yosemite.
My only note about this trail: There are mosquitoes. Hella mosquitoes. Don’t come unprepared if you come in the evening.
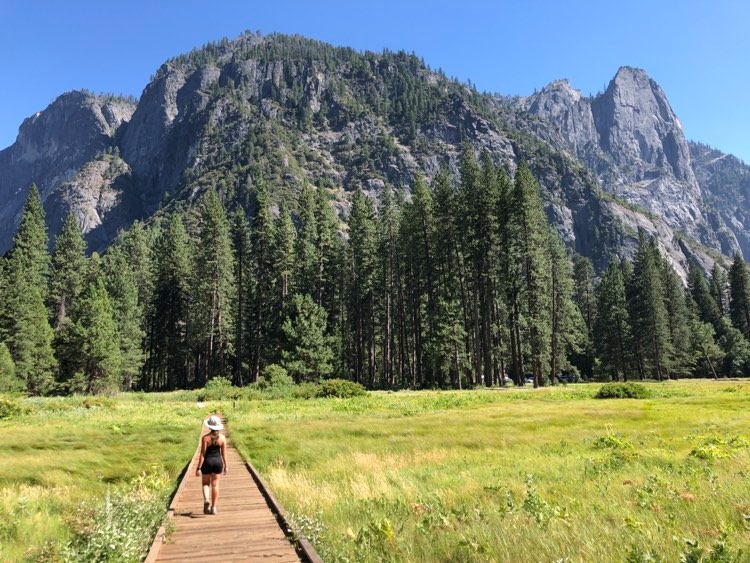
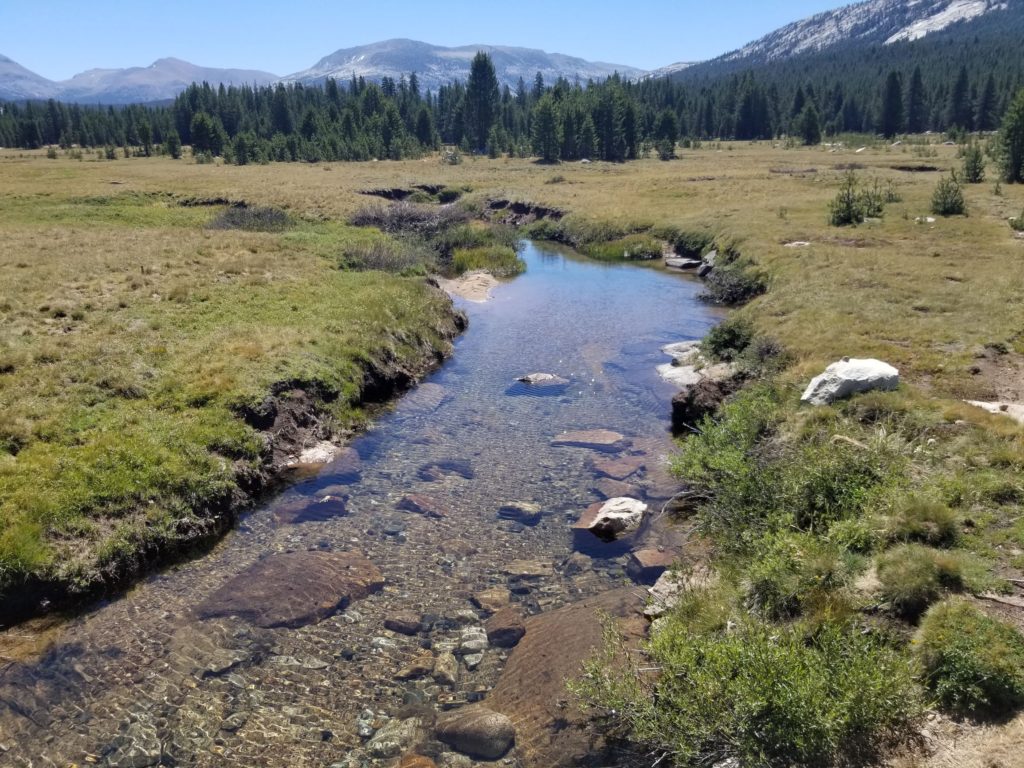
4) Explore at least two meadows: Cook’s & Tuolumne
When it comes to hiking, I generally know what I want. I want to climb some mountains, admire some trees, splash some water and gawk at some flowers and moss. I am never prepared to fall in love with the meadows.
This is ridiculous, of course, because Yosemite is home to some of the best meadows you can find in the contiguous United States. Looking out over the (summertime) wildflowers and varying shades of green, you will suddenly understand all of John Muir’s quotes.
I named two meadows in this guide because they’re both worth seeing and honestly easy strolls. You may be wondering how different two meadows can really be, but let me assure you that they each have their own charm.
Cook’s Meadow is in the middle of Yosemite Valley. You can take a loop trail to get 360 views of the entire Valley and admire both the granite rock faces and the lush vegetation of the meadow. Along the trail, you can also find signposts telling the history of the meadows, learning about the plants and their cultural significance. If you’re lucky, you may even see a bear in the distance.
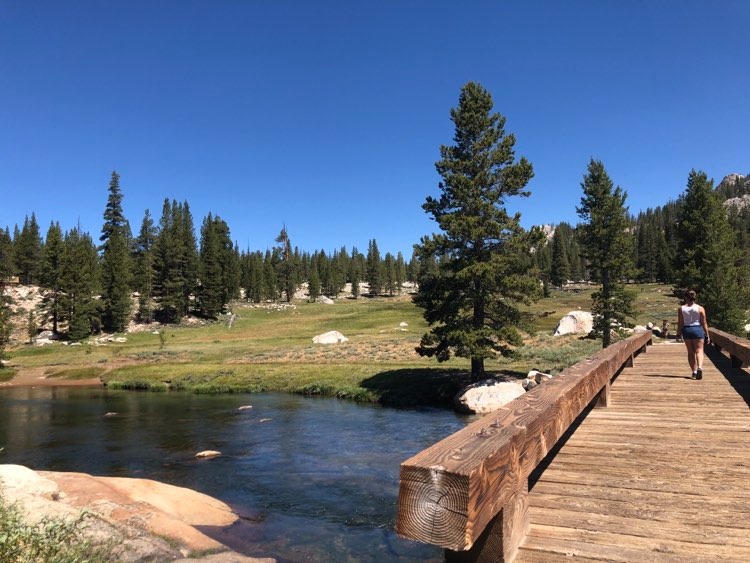
Tuolumne Meadows may seem similar at first glance but is a different experience altogether. These meadows are about an hour or so drive outside the Valley, and they offer a true respite in nature away from the crowds. Although there are some people walking along the trail and boardwalk, it is easy to ignore them and feel more or less alone in the meadow. While you don’t have the granite views of the Valley walls, you have the distant mountains and trees. There is also a stream trickling through the meadow, and you are more likely to see some deer friends in the distance.
5) Chase at least one waterfall
(Sorry TLC)
I’ll admit this part of the guide is season-dependent. But if you come to Yosemite at the right time of year (late spring through early fall), a decent waterfall is easy to find. You can even pair it with one of the other items on the list. We saw two falls with our first big hike, then then the Lower Yosemite Falls by walking an easy loop. Regardless, you can’t go wrong checking out one of the great waterfalls of Yosemite.
If you’re wondering how we fit all of this into (just over) 48 hours, this was our itinerary:
Day 1:
- Morning: Hike to Vernal & Nevada Falls via the Mist Trail, return via John Muir Trail
- Early afternoon: Lunch from the Village Grill (chipotle chicken sandwiches – eaten in car)
- Mid-afternoon: Lower Yosemite Falls hike and Cook’s Meadow Loop
- Early evening: Tenaya Lake Trail
- Evening: Return to Mammoth
Day 2:
- Morning: Four-Mile Trail to Glacier Point
- Early afternoon: Lunch from Base Camp Eatery (orange chicken and Asian-style noodles, eaten at El Capitan picnic spot)
- Mid-afternoon: Mariposa Grove of Giant Sequoia via Washburn Trail
- Evening: Return to Mammoth
Day 3:
- Morning: Tuolumne Meadows
- Afternoon: Leave Yosemite
I know, I know, that’s technically more than two days. Because we stayed in Mammoth, we got to drive through Yosemite on our way to our next destination. This location made it possible for us to technically have a little bit longer in Yosemite. But even if we hadn’t we would have found a way to work the Tuolumne Meadows into our second day.
A Note on COVID:
Due to the COVID-19 pandemic, Yosemite is limiting the number of people allowed in the parks on a daily basis. Many conservationists have actually been lobbying for this rule for years to help preserve the park. So, while annoying, it is what is currently best for the health and safety of both the visitors and the nature of the park.
You have to get a permit on the National Park website in advance of your trip. The best time to do this is on the day they go on sale the month before the trip when 80 percent of the passes are available. However, you can also take a chance at getting them two days before when the other 20 percent go on sale. You can also book a room at one of the lodges inside park boundaries to get into park. If you do this, you don’t need a permit.
Once you have your permit, you must enter for the first time on the day you selected for the permit. After that, it is good for seven consecutive days of entry. A park ranger will be at the entrance to check your permit if you go through a popular entrance or time of day.
We stayed in Mammoth and went through the Tioga Pass entrance early in the morning, so there was no park ranger. Instead, we had to fill out a self-serve form with our registration number. You have to display this pass in the windshield of your vehicle at all times, and park rangers do check. You cannot even drive the road that cuts through Yosemite without a permit.
Masks & social distancing
In California, it is required to wear a mask whenever you’re around other people – even outdoors. Aside from being a rule, it’s also common courtesy to try to keep your germs contained with a face covering right now. I recommend instead carrying a face covering with you in a spot that is easily accessible when you come across other people. Some hikers wore a bandana around their necks they could easily pull up around their mouth and nose. I wore hiking gear with pockets that allowed me to keep a mask handy and snap it on whenever I was within 10 feet of other humans.
Luckily, Yosemite is over 1,100 square miles, so social distancing can be pretty easy in many areas. Especially if you get outside the Valley.
A Note on Bears:
U.S. West Coast black bears are very different from other black bears. There has never been a serious black bear attack in Yosemite National Park. In general, black bears just don’t want to be startled, so make sure you’re making a lot of noise while hiking so as not to sneak up on them. If you see a black bear in a common human space like a parking lot or campground, make a lot of noise and get as big as possible to scare it away. If you encounter one from a distance while hiking, keep your distance until it scurries along. Remember, black bears have a natural fear of humans. They don’t want to eat you.